
Docker OS GPU for Apt Installation Recipe
These are the steps to install OmniSci as a Docker container on an Ubuntu machine running with NVIDIA Kepler or Pascal series GPU cards.
- The installation phases are:
Preparation
Prepare your host by installing NVIDIA drivers, Docker, and NVIDIA runtime.
Install NVIDIA Drivers
To install NVIDIA drivers, open a terminal window on the host. Run apt update
and apt upgrade to ensure that you are using the latest operating
system software.
sudo apt update
sudo apt upgrade
Use apt-get to install required utilities.
sudo apt-get install \
    apt-transport-https \
    ca-certificates \
    curl \
    gnupg-agent \
    software-properties-common
Reboot your system to activate all of your changes.
sudo reboot
Install CUDA
Verify that the gcc compiler is installed with the following command.
gcc --versionIf no version information returns, run the following command.
sudo apt install gcc
To install the CUDA package.
- Go to https://developer.nvidia.com/cuda-downloads.
- Select the target platform by selecting the operating system (Linux), architecture (based on your environment), distribution (Ubuntu), version (based on your environment), and installer type (OmniSci recommends deb (network)).
- Install the CUDA package using the installation instructions on the NVIDIA web site.
- Reboot your system to ensure that all changes are active:
sudo reboot
Install Docker
Remove any existing Docker installs and the legacy NVIDIA docker runtime.
sudo docker volume ls -q -f driver=nvidia-docker | xargs -r -I{} -n1 docker ps -q -a -f volume={} | xargs -r docker rm -f
sudo apt-get purge nvidia-docker
Remove Docker.
sudo apt-get remove docker docker-engine docker.io containerd runc
Update with apt-get.
sudo apt-get update
Use curl to download the latest Docker version.
sudo curl -fsSL https://download.docker.com/linux/ubuntu/gpg | sudo apt-key add -
Add Docker to your Apt repository.
sudo add-apt-repository \
   "deb [arch=amd64] https://download.docker.com/linux/ubuntu \
   $(lsb_release -cs) \
   stable"
Update your repository.
sudo apt-get update
Install Docker, the command line interface, and the container runtime.
sudo apt-get install docker-ce docker-ce-cli containerd.io
Optional: Run the following usermod command so that docker command execution does not require sudo privilege.
Log out and log back in for the changes to take effect.
sudo usermod -aG docker $USER
Checkpoint
Verify your Docker installation.
sudo docker run hello-world
Install NVIDIA Docker runtime
Use curl to add a gpg key:
curl -s -L https://nvidia.github.io/nvidia-container-runtime/gpgkey | \
  sudo apt-key add -
  distribution=$(. /etc/os-release;echo $ID$VERSION_ID)
Update your sources list:
curl -s -L https://nvidia.github.io/nvidia-container-runtime/$distribution/nvidia-container-runtime.list | \
  sudo tee /etc/apt/sources.list.d/nvidia-container-runtime.list
Update apt-get and install nvidia-container-runtime:
sudo apt-get update
sudo apt-get install -y nvidia-container-runtime
Edit /etc/docker/daemon.json to add the following, and save the changes:
{
 "default-runtime": "nvidia",
  "runtimes": {
     "nvidia": {
         "path": "/usr/bin/nvidia-container-runtime",
         "runtimeArgs": []
     }
 }
}
Restart the Docker daemon:
sudo pkill -SIGHUP dockerd
Checkpoint
Verify Docker and NVIDIA runtime work together.
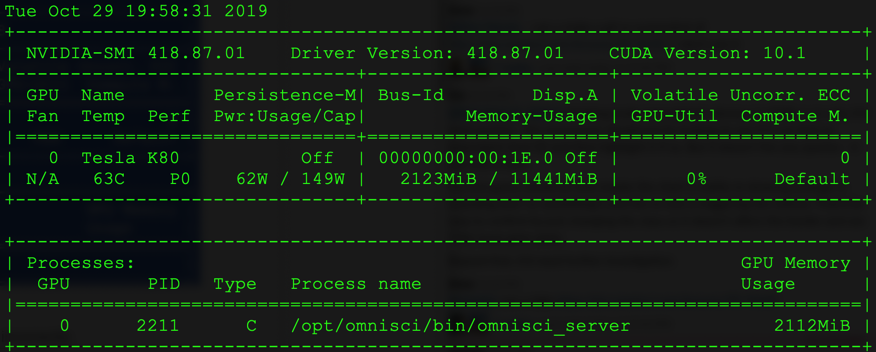
sudo docker run --runtime=nvidia --rm nvidia/cuda:10.0-runtime-ubuntu18.04 nvidia-smi
Standard NVIDIA-SMI output shows the GPUs in your instance.
Installation
Download OmniSci from DockerHub and Start OmniSci in Docker.
sudo docker run --runtime=nvidia \
--name omnisci \
-v $HOME/omnisci-docker-storage:/omnisci-storage \
-p 6273-6280:6273-6280 \
omnisci/core-os-cuda:latest
| Note |
On startup, you receive the following error:
config file does not exist, ignoring --config /omnisci-storage/omnisci.confThis is expected behavior, because OmniSci does not ship with a default omnisci.conf file. To use OmniSci with the capabilities enabled by omnisci.conf:
|
For more information on CUDA driver installation, see the CUDA Installation Guide.
See also the note regarding the CUDA JIT Cache in Optimizing Performance.
For more information on Docker installation, see the Docker Installation Guide.
Command Line Access
You can access the command line in the Docker image to perform configuration and run OmniSci utilities.
You need to know the container-id to access the command line.
Use the command below to list the running containers.
sudo docker container ls
You see output similar to the following.
CONTAINER ID        IMAGE               COMMAND                  CREATED             STATUS              PORTS                                            NAMES
9e01e520c30c        omnisci/omnisci-ee-cpu    "/bin/sh -c '/omnisci..."   3 days ago          Up 3 days           0.0.0.0:6273-6280->6273-6280/tcp                 confident_neumann
Once you have your container ID, you can access the command line using the
Docker exec command. For example, here is the command to start a Bash session
in the Docker instance listed above. The -it switch makes the
session interactive.
sudo docker exec -it 9e01e520c30c bash
You can end the Bash session with the exit command.
| Note | On Ubuntu, nvidia-docker
has a dependency on nvidia-modprobe. If you receive the message: Error: Could not load UVM kernel module. Is nvidia-modprobe installed? you can install nvidia-modprobe using the following commands.
sudo apt-add-repository multiverse sudo apt update sudo apt install nvidia-modprobe |
Activation
To verify that all systems are go, load some sample data and perform an
omnisql query.
OmniSci ships with two sample datasets of airline flight information collected in 2008, and one dataset of New York City census information collected in 2015. To install the sample data, run the following command.
sudo docker exec -it <container-id> ./insert_sample_data
Where <container-id> is the container in which OmniSci is running.
When prompted, choose whether to insert dataset 1 (7,000,000 rows), dataset 2 (10,000 rows), or dataset 3 (683,000 rows). The examples below use dataset 2.
Enter dataset number to download, or 'q' to quit:
#     Dataset                   Rows    Table Name             File Name
1)    Flights (2008)            7M      flights_2008_7M        flights_2008_7M.tar.gz
2)    Flights (2008)            10k     flights_2008_10k       flights_2008_10k.tar.gz
3)    NYC Tree Census (2015)    683k    nyc_trees_2015_683k    nyc_trees_2015_683k.tar.gz
Connect to OmniSciDB by entering the following command (default password is HyperInteractive):
docker exec -it <container-id> /omnisci/bin/omnisql
password: ••••••••••••••••
Enter a SQL query such as the following:
omnisql> SELECT origin_city AS "Origin", dest_city AS "Destination", AVG(airtime) AS
"Average Airtime" FROM flights_2008_10k WHERE distance < 175 GROUP BY origin_city,
dest_city;
The results should be similar to the results below.
Origin|Destination|Average Airtime
Austin|Houston|33.055556
Norfolk|Baltimore|36.071429
Ft. Myers|Orlando|28.666667
Orlando|Ft. Myers|32.583333
Houston|Austin|29.611111
Baltimore|Norfolk|31.714286