
Getting Started with OmniSci on Google Cloud Platform
| Note | MapD has been rebranded to OmniSci. |
Follow these instructions to get started with OmniSci on Google Cloud Platform (GCP).
Prerequisites
You must have a Google Cloud Platform account. If you do not have an account, follow these instructions to sign up for one.
Launching Your OmniSci Instance
To launch OmniSci on Google Cloud Platform, you select and configure an instance.
- Search for OmniSci on the omnisci-launcher-public project on Google Cloud Platform, and select a solution.
OmniSci has four instance types, with hourly pricing for all Enterprise editions:- OmniSci Open Source Edition
- OmniSci Enterprise Edition (BYOL)
- OmniSci Enterprise Edition for CPU (BYOL)
- OmniSciDB for CPU (Open Source).
- On the solution Launcher Page, click Launch on Compute Engine to begin configuring your deployment.
Important Before deploying a solution with a GPU machine type, avoid potential deployment failure by checking your available quota for a project to make sure that you have not exceeded your limit. - On the new deployment page, configure the following:
- Deployment name
- Zone
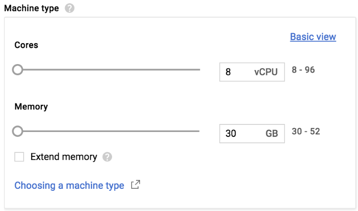
- Machine type - Click Customize and configure Cores and Memory, and select Extend memory if necessary.
- GPU type. (Not applicable for CPU configurations.)
- Number of GPUs - (Not applicable for CPU configurations.) Select the number of GPUs; subject to quota and GPU type by region. For more information about GPU-equipped instances and associated resources, see GPU Models for Compute Engine.
- Boot disk type
- Boot disk size in GB
- Networking - Set the Network, Subnetwork, and External IP.
- Firewall - Select the required ports to allow TCP-based connectivity to OmniSci. Click More to set IP ranges for port traffic and IP forwarding.
- Accept the GCP Marketplace Terms of Service and click Deploy.
- In the Deployment Manager, click the instance that you deployed.
- Launch the OmniSci Immerse client:
- Record the Admin password (Temporary).
- Click the Site address link to go to the OmniSci Immerse login page. Enter the password you recorded, and click Connect.
- Copy your license key from the registration email message.
If you have not received your license key, contact your Sales Representative or register for your 30-day trial here. - Connect to Immerse using a web browser connected to your host machine on
port 6273. For example,
http://omnisci.mycompany.com:6273. - When prompted, paste your license key in the text box and click Apply.
- Click Connect to start using OmniSci.
On successful login, you see a list of sample dashbords loaded into your instance.